Import, transform, and use your data from CSVs into Coda
CSV (comma-separated-value) files are one of the most common formats for storing semi-structured data. CSVs are most often composed of columns and rows, which you can visualize in a spreadsheet (e.g., Google Sheets, Microsoft Excel), downloaded from a database table (e.g., MongoDB, Firebase), or a no/low-code tool for specific use-cases such as Asana, Trello, Jira, and others.
Due to its common use, CSV files can be easily manipulated and exported/imported across tools. In this video some time ago I explored the effectiveness of Notion and Coda at loading and manipulating a relatively large CSV file.
This article explores how to effectively import data into Coda from CSV files and other third-party tools. In Coda, there are three ways to import data as of February 2024: CSV imports, the native importers (for some tools—e.g., Notion, Trello, Confluence), and Coda Packs (using the Coda API to get data from third-party tools).
How to import data from CSV into Coda
One of the most versatile ways to import data into Coda involves using a CSV file. It is best if the CSV file contains headers on the first row so that we can use those as the columns in the Coda table that will be created from the CSV.
To import a CSV file into Coda, type “/import” or select “Insert” at the top right of the page where you would like to create the new table, then navigate to the “Import” menu, and select “CSV” among the available options. This will prompt you to upload the CSV file, decide if you intend to create a new table or import the new data into an existing table, and select whether the CSV has headers in the first row.
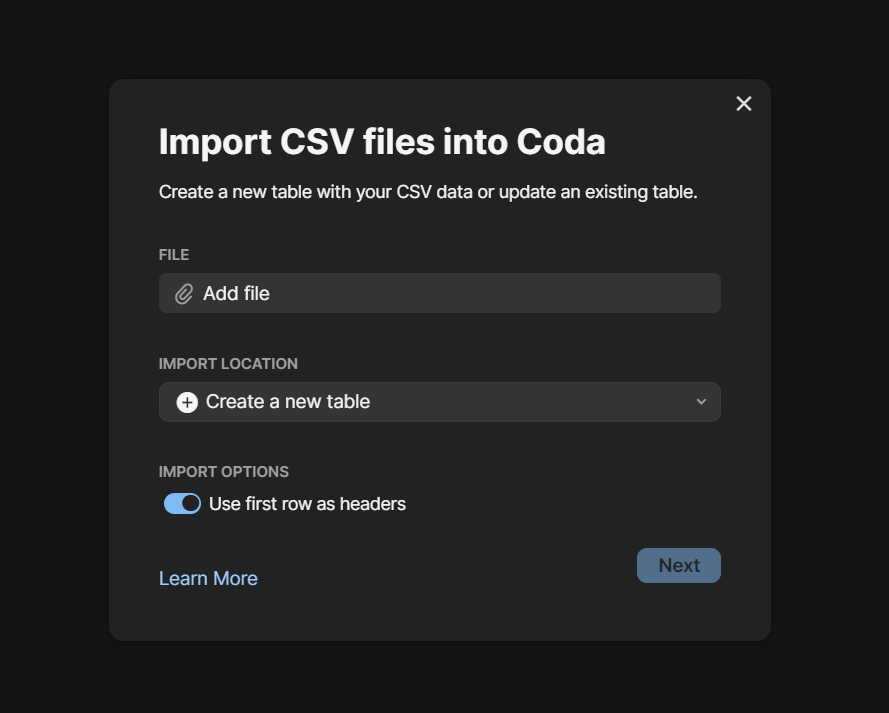
A screenshot of the CSV import wizard in Coda
Once you click “Next”, the data will begin importing, and it will take from a few seconds to a few minutes depending on the quantity of data imported. Once that process is complete, I find that it is a good practice to check for the quality of the data, and the format of the columns. For example, sometimes there may be a column that is of type “email” that may be formatted as simple text through the import. In such a case, you may want to turn that column into an “email” type column.
In more advanced cases, you may have imported data from related tables (e.g., “Organizations” and “Contacts” as part of a CRM you are building in Coda). Therefore, in the “Contacts” table, there may be a column of text type named “Organization” that represents this relationship. The import wizard doesn’t recognize the relation property itself, so you will get to do some data cleanup and relate the contacts and organizations in bulk. There is a dedicated section in the video explaining how to do this. These are the main steps, following the example of an Organizations-Contacts relational tables:
In the “Organizations” Coda table, set the organization name as the display column (primary key).
In the “Contacts” Coda table, turn the “Organization” column into a relation column type. This will automatically turn the values into relational chips (if the column contains the organization name corresponding to the ones in the Organizations table).
Quality check the data and ensure all the contacts have their organization turned into a relation value. You can manually adjust the data as needed.
In case the steps above do not work, you can create a new relation column in the “Contacts” table that points to the “Organizations” table, and then copy-paste the values from the old “Organization” column of text type to the new “Organization” column of relation type.
How to import data from other tools/formats into Coda
Besides the CSV import wizard that makes it easy to add data into Coda, there are also importers for third-party tools specifically developed by the Coda team. The available third-party tool import wizards as of February 2024 are Google Docs, Excel/Sheet (a simple copy-paste), Notion, Confluence, Airtable, and Trello.

A screenshot of the Insert menu in a Coda doc with some of the import options
You can find these importers from the same “Import” menu where the CSV importer is located. Depending on the tool you select, the import process may differ. For example, for Confluence, Airtable, and Trello, the process involves connecting your account and pulling data from specific boards/tables. For the Notion importer, you would get to upload an HTML document with the Notion data you intend to import. All of these native importers also provide guides to help you understand more details of the import process and what to expect.
How to use Coda Packs to sync third-party tools
Finally, you may use existing Coda Packs or create your custom Coda Pack to send data from a third-party tool into Coda. The Coda Pack ecosystem offers a ton of packs from many third-party software. Coda Packs use APIs to sync data between different software. The advantage of this approach is that you can very easily sync data from your third-party tool into Coda. The possible drawback is that if you shut down your account on the third-party tool that sends data to Coda via the Pack, the sync will stop working and the data not available anymore. As a consequence, using Coda Packs is a great approach when you do not plan to replace the source software with Coda, but rather integrate it with Coda as part of your overall tools stack and workflow.
FAQs and edge cases
-
The most important practice is to structure the CSV file so that the first row is composed of header columns. This will ensure the algorithm accurately recognizes the columns during the import process and creates the corresponding columns.
-
No, as of March 2024
-
The importer will only import the first workbook (tab) from your spreadsheet. If you intend to import all the workbooks, proceed with one at a time.
-
It depends on the specific situation. In general, there are two main possible scenarios:
1. You use “import CSV” on a Coda table that does not have any rows yet. In this case, the CSV import will work smoothly and the data get loaded into Coda.
2. You use “merge with CSV” on a Coda table that already has a defined data structure and rows. In this scenario, the CSV data will be added to the Coda table, including potential duplicates. As of February 2024, “import CSV” in Coda does not detect duplicates and is not capable of updating existing pages automatically. You can use conditional formatting to highlight duplicate rows in Coda tables (see this doc for an example), or use the Coda API to delete duplicates.
-
Yes, by using a tool such as Make/Zapier/n8n/Pipedream (or any other API software). In this case, a possible process to achieve a successful automatic import process is the following:
1. Clean up the CSV file data to ensure the appropriate column format
2. Upload the CSV into Google Drive and turn it into a Google Sheets
3. Connect your Google Sheets and Coda accounts in the dedicated API app
4. Develop the automation logic to handle relation columns if needed. You can do this by running the automation on one spreadsheet tab at a time, where each tab corresponds to a different table in Coda. Ensure there is at least one common property value between related entities as part of the import process so that you can include logic in the automation to find related pages and successfully link them.
-
You can undo an import by hitting CTRL/CMD+Z on your keyboard, or deleting the newly imported table completely.
Similar Articles
Affiliate Links
Build your web forms with Tally (integrates natively with many tools)
Get one free month on the pro plan in Make (automation software)
Get 20% off any Centered subscription (deep work sessions tracker with AI coaches) by using the discount code
SIMONE20here.